WinNTSetup v3.9.1 (Windows Setup Tool) Portable
WinNTSetup (Windows Setup Tool) is a program for creating an additional bootable module of the Windows operating system. The utility is a kind of alternative installer, which allows you to install the second operating system as a free partition of an internal or external hard disk, and a virtual hard disk (VHD) and a USB flash drive. In this case, the presence of a flash drive or a disk with a distribution kit is not necessary (but, if necessary, you can use these drives for installation).
The main features of WinNTSetup include the following:
Supports working with Windows 2k / XP / 2003/2008/2012 / Vista / 7 / 8.x x86 / x64.
No installation required (Portable version).
Completely Russified interface.
Works even on the most minimalistic WinPE.
Supports all existing WIM files: WIM / SWM (XPRESS / LZX / XPRESS HUFFMAN = Wimboot compression).
Supports unencrypted ESD files (LZMS compressed WIM).
Supports the WimBoot option.
Supports "Windows to Go" for Windows 7 and later.
Supports the integration of drivers into the system.
Flexible preset settings.
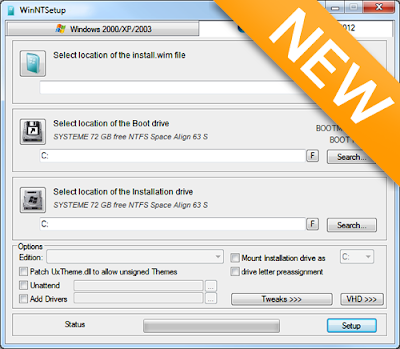
WinNTSetup how to use It's quite easy to use the program, but if you have difficulties, this instruction will help you.
At the first start the program will require the download of additional ADK files for further work, load and get into the main program window.
Specify the path to the file install.wim, which lies in the folder with the unzipped ISO image of the operating system distribution.
Specify the disk partition for boot sector and boot manager. The disk partition must be active, for this you need to go to "Disk Management" of the Windows system and "Make the partition active". After this action, all manipulations with WinNTSetup must be completed until the end, otherwise you can not boot (you can not shut down or restart the computer after this stage).
Specify the partition where Windows will be installed (this can be the same partition where the bootloader is installed). Press the "F" button located next to the selection button and format the selected partition.
Specify the folder with the drivers (if necessary, you can immediately select the driver for a specific hardware).
We press the "Installation" button, we must check "Find and add all versions of Windows" in the boot menu and "Automatically restart the PC after installation".
We expect unpacking the image.
The computer restarts, we select the newly installed system from the boot menu.
We are waiting for the definition of devices and the creation of accounts after the first launch.
Additional libraries and software are better to install later, with the help of WPI. Installing Windows on a virtual hard disk (VHD)
In WinNTSetup there is a built-in function to create VHD - a virtual hard disk, on which you can install the second system. This method is more preferable, because it is simpler and safer than described above, because the system is not put on a separate logical partition, which must be prepared beforehand.
Create VHD partitions and assign a drive letter.
Select the VHD drive as the drive installation (make sure that you load the IST disk into the active partition on the physical disk - you can make it active through "Disk Management").
The program has an impressive functionality, easy to learn and easy to use. It is distributed exclusively for free. The archive includes a version for 32 and 64 bit Windows systems that does not require installation.
WinNTSetup is designed to customize your Windows operating system before you install it. During the install, you will be prompted to download the Windows Assessment and Deployment Kit (Windows ADK), and Microsoft app thats around 2MB. The interface seems very user-friendly. It is split into two tabs, one for Windows 7, and the other for Windows 2000, XP, and 2003. There are balloon tips if you mouse over anything you dont understand.
You just need to select the location of the installation. Additional options are given as well including patch UxTheme.dll, unattended installation, adding drivers, drive letter pre-assignment, mode, tweaks, and VHD (Virtual Hard Disk).
There's a settings button as well as twenty-five additional tweaks, but frankly, they're more geared to the standard operating systems. Some examples are removing "shortcut to" arrows, disable system restore, XP style taskbar buttons, show Quick Launch, etc. Users of Windows 10 are now more interested in privacy, removing Cortana and other settings that are missing here. Another missing option is the ability to disable indexing to speed up the drive access.
Finally, there is the option to import registry tweaks. Windows Embedded is not supported. While it should work on all versions of Windows, USB drives are only supported on Windows 10, 8, and 7. Overall, WinNTSetup is excellent for anyone who needs to mass deploy any standard tweaks. That said, Windows 10 users will be disappointed by the lack of more current tweaks we typically apply.
Features
Install Windows 2k / XP / 2003/2008/2012 / Vista / 7 / 8.x / 10 x86 / x64
.compared essentially even on the most minimalistic WinPE
choose available drive letter for the new windows installation
if also nlite / vlite has remove winnt32.exe / setup.exe
Integrate drivers: normal PNP and textmode drivers, too!
patch uxtheme to the allow an unsigned themes
use some often the Used tweaks for the new installation
Supporting "the Windows to the Go" for the Windows 7 and later installs
Supports WimBoot option for the Windows 8.1 the Update 1
Supports ESD images
DOWNLOAD HERE
WinNTSetup v3.9.1 (Windows Setup Tool) Portable
 Reviewed by Mazhar Ali
on
7:25 AM
Rating:
 Reviewed by Mazhar Ali
on
7:25 AM
Rating:


